
Fast forward to Christmas last year and everything I needed was under the tree. Apparently he was adding to cart as I was going on about how cool this pattern was and bought months ago. I think he's a keeper!
So naturally after all the Christmas festivities were done and we're ready to sit back and relax, I started looking through the color requirements and fabric I had and and assigning fabric to colors in the pattern. Some colors had more than they needed and others were a tad short. That's just what happens when you're using a fat quarter bundle and the pattern calls for 3/8 of a yard.
But between the Bee Vintage bundle and a small calico cat quarter bundle from Lori Holt as well, I only needed to order a half yard of fabric in chocolate brown to get enough contrast. Not bad. The background neutrals came from my stash, but I tried to keep them very low volume and more light cream than white.

I started sewing the blocks together the day after Christmas and started with block 2 as I was waiting for the chocolate brown fabric to make block 1. In hindsight, I'm not sure if I would start with the largest blocks again, but it does make sense since they need so much fabric and it took almost a whole fat quarter for some so if I would have waited until later, I'd be making some creative design choices.

As it was, I did end up making the quilt larger than the pattern. I had measured the finished size on my bed and realized I'd prefer a little more overhang off the sides of my bed. Instead of just adding a strip of 8" blocks down one side, I looked at the end of the pattern on how the quilt was put together in sections and added my blocks in that way. I look at the finished quilt now and I can't tell you which blocks I added. I'm quite impressed with myself.

It took about a month and a half to piece the entire top, many blocks were made that week between Christmas and New Year's since I took off from work that week. But I worked on it a little after work each day, some days only choosing colors and cutting all the pieces, other days cutting and sewing. It just depended on what I had the energy for after work.
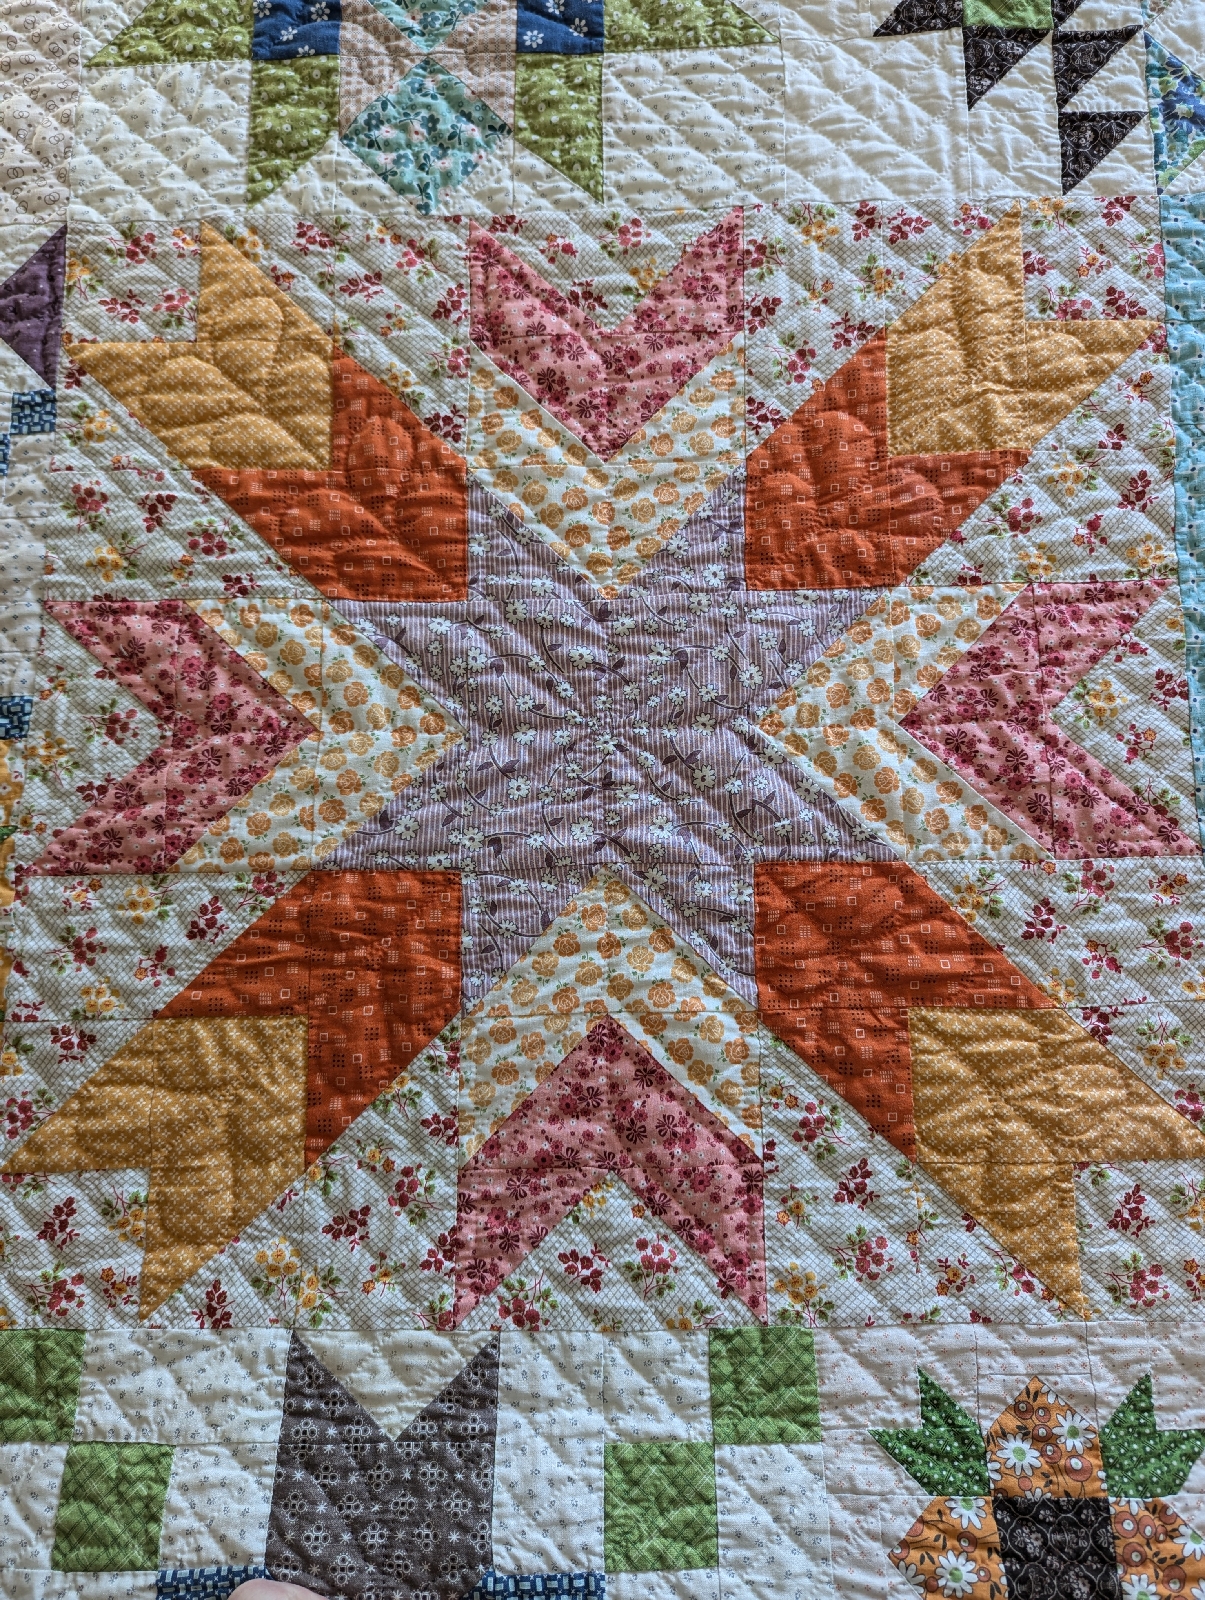
But it felt like the real work began once the top was done. I had decided when I received the pattern that I would be hand quilting this one and as the blocks came together, that I wanted to do custom quilting in each star. Oh, and why not use 12 different color threads while I was at it? So while I was finishing hand quilting my 12.5 year grandmother's flower garden quilt, I doodled each of the blocks out and started contemplating quilt patterns at lunch while at work.

Since this felt like a super special quilt, and I was planning on putting it on my bed over winter, I decided to use Hobbs Tuscany Wool batting for this quilt. I feel like the investment was worth it. Wool is a dream to quilt through as I only learned last year and I also thought that the loft of the wool batting would let my quilting show up a bit better. Now that it's been washed and dried, and honestly even before that, this quilt has the best texture. While it doesn't have as much crinkle as cotton batting would create, the loft creates a contrast with the stitches.

I outlined each block, thinking that would help the stars pop off the quilt a bit better, then I crosshatched the entire background an inch apart. Despite taking 2 spools of thread, the background was probably the easiest/quickest to quilt. Ok, I lied. I started cross hatching the background but my hoop was getting caught in the wool batting and leaving bits of fluff everywhere. So I completely quilted the entire outside edge about 8" in, so I could bind it before quilting the rest. I used a scrappy binding made from leftover fabric, of which I have enough to make a lap quilt, and I think that was the right choice over a single binding.

Once bound, I was back to finishing quilting the background. Then the fun really began. I tried out a bunch of new quilting designs, at first they were marked but about halfway through I mainly started free handing it, and I don't think you can tell. I learned that larger feathers I don't mind so much, but small feathers I don't enjoy at all. You can sort of see the small feathers in the white chevron shape below.

All in all, I had a lot of fun working on this sampler quilt. And I would make another sampler quilt, not this pattern again, because I tend to not make a pattern more than once unless I'm drastically changing something (completely different colors/shades/values) or I need a quick quilt (such as the Oh My Stars pattern that I made twice last fall). I also found that I think I enjoy the asymmetrical samplers more than a sampler of all the same size block. I received another sampler book for Christmas this year and there has been one that I've been wanting to make since I started quilting. I may or may not get around to making those this year, it kinda depends on what else is going on.
Happy quilting!


No comments:
Post a Comment